Guide: Make a Mautic form show in two columns (works for Landing Pages and Embeds)
Guide: Make a Mautic form show in two columns (works for Landing Pages and Embeds)
1) What you’ll do (summary)
- In each Form Field → Attributes → Field container attributes, add class="half" for fields you want side-by-side, and class="full" for fields that must span both columns (textarea, message, submit).
- Add a small CSS block that turns the form’s inner wrapper into a 2-column grid and respects those classes.
- Put that CSS either on the Mautic Landing Page (inline or theme) or on the external page (for JS embeds). For iframe embeds, put the CSS in your Mautic theme.
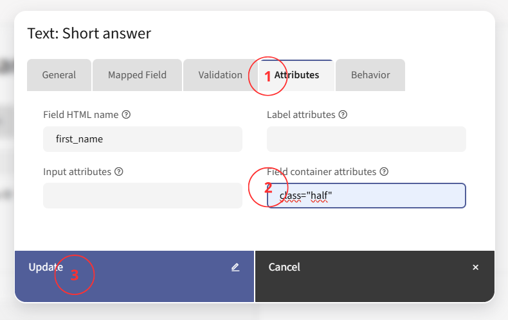
2) Add classes to your fields
For each field in the form:
- Open the field → Attributes tab → Field container attributes.
- Set:
- class="half" → for fields that should share a row (e.g., First name, Last name, Email, Phone).
- class="full" → for wide fields (e.g., Company, Message/Comments, Consent checkbox, Submit button).
Why here? Because Mautic wraps every field in a .mauticform-row.
When you set that attribute, Mautic renders:
<div class="mauticform-row half"> … </div>
which is perfect for targeting with CSS.
Tip: You can mix—e.g., First Name (half), Last Name (half), Email (half), Phone (half), Message (full), Submit (full).
Example field layout
- First name → class="half"
- Last name → class="half"
- Email → class="half"
- Phone → class="half"
- Company → class="full"
- Message (textarea) → class="full"
- Submit → class="full" (or rely on the safety rule for .mauticform-row--buttons)
This will render the first four fields in two rows of two, then stack the rest.
3) How to find your (scoping the CSS)
When you view the form on a page, inspect the outer wrapper—it looks like:
Here, the alias is exampleform. Replace in the CSS with that value for tight scoping.
(Not strictly required, but prevents collateral styling if you have multiple forms.)
How to find it easily:
- Open the page where your form is displayed (either on a Landing Page or embedded on your website).
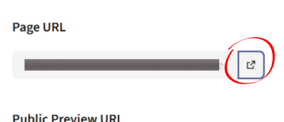
- Right-click on the form and select “Inspect” or “Inspect Element” (in Chrome, Edge, or Firefox).
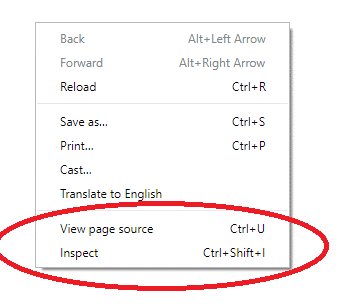
- In the code panel that opens, look for a line similar to this one:
<div id="mauticform_wrapper_exampleform" class="mauticform_wrapper">
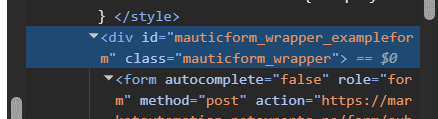
- The text that appears after mauticform_wrapper_ is the alias of your form.
- In this example, the alias is: exampleform.
- Write it down — you’ll need it in the next step to customize your form’s CSS.
This alias is important because we’ll use it to scope the CSS styles so they only apply to this specific form and don’t affect others.
4) Paste the CSS (3 placement options)
Option A — Mautic Landing Page (no file access needed)
Add a Code/Raw HTML block at the top of your landing page and paste:
<style>

/* Replace <alias> with your actual form alias (see step 3) */

#mauticform_wrapper_<alias> .mauticform-innerform { display:grid; grid-template-columns:repeat(2,1fr); gap:14px 20px; }

/* Half = normal two-column; Full = span both columns */

#mauticform_wrapper_<alias> .mauticform-row.half { grid-column:auto; }

#mauticform_wrapper_<alias> .mauticform-row.full,

#mauticform_wrapper_<alias> .mauticform-row.mauticform-row--buttons { grid-column:1 / -1; }

/* Mobile: stack to one column */

#mauticform_wrapper_<alias> .mauticform-page-wrapper { grid-template-columns:1fr; } } </style>
Option B — External site (JS embed)
Paste the same
<style>…</style>
block in your site’s CSS (or a global header). It will style the embedded form because the JS embed injects the form into your page’s DOM (not sandboxed).
Option C — Iframe embed
Your site’s CSS cannot reach into the iframe. Put the CSS in your Mautic Landing Page theme file (e.g., /themes//css/theme.css). Then clear cache and re-publish.
7) Troubleshooting checklist
- All fields still stack in one column?
- If embedded: make sure you used the JS embed, not the iframe, or move the CSS into the Mautic theme (for iframe).
- Increase selector specificity (keep the #mauticform_wrapper_<alias> prefix).
- Check for theme frameworks (Bootstrap, etc.) overriding .row—your wrapper is .mauticform-row, which avoids most conflicts.
- CSS not taking effect on a Landing Page?
- Ensure the <style> block is actually rendered (place it above the form in a Code/Raw block).
- Clear Mautic cache (Configuration → Maintenance) if you modified theme files.
- Submit button not full width?
- Add class="full" to the field container attributes of the button, and/or keep the safety CSS for .mauticform-row--buttons.
- Need spacing between label and input?
Adjust with:
#mauticform_wrapper_<alias> .mauticform-label { margin-bottom: 6px; display:block; }
- Accessibility
- Two-column forms can be harder to scan; ensure mobile stacks to one column (the CSS above does this). Keep labels visible; don’t remove them.
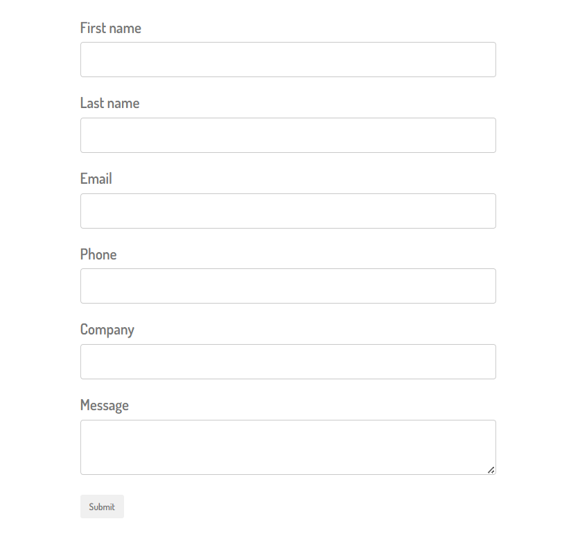
8) Final Result
This is how your form should look after applying the classes and CSS:

Fields with class="half" are aligned in two columns, while those with class="full" take up the full width of the form.
9) Notes on versions/themes
- Works on recent Mautic versions (v4+ incl. v5/v6) because it targets the stable .mauticform-* structure.
- If your Landing Page theme minifies or aggregates CSS/JS, clearing cache after edits helps.
Done!
That’s all you need to get clean, responsive two-column Mautic forms—on Landing Pages or when embedded.
Article Number: 236
Author: Oct 7, 2025
Last Updated: Oct 8, 2025
Author: Renato Carabelli [[email protected]]
Online URL: https://kb.mautic.org/article/guide-make-a-mautic-form-show-in-two-columns-works-for-landing-pages-and-embeds.html