How to Use the SendGrid API in Mautic 5 with Symfony Mailer
By default, Mautic offers built-in support for several mail transports, including SMTP and SendGrid. However, if you prefer more direct control using Symfony’s Mailer component, you can install the symfony/sendgrid-mailer package and configure Mautic to use sendgrid+api as the transport. This guide shows you how.
Table of Contents
- Prerequisites
- Step 1: Install Symfony SendGrid Mailer
- Step 2: Generate a SendGrid API Key
- Step 3: Configure Mautic to Use sendgrid+api
- Step 4: Test Your SendGrid Integration
- Troubleshooting & Tips
- Summary
Prerequisites
- An existing Mautic 5 installation (with Composer enabled).
- A SendGrid account (free or paid).
- Command-line access to your Mautic server.
Step 1: Install Symfony SendGrid Mailer
SSH into your server, navigate to your Mautic folder (often/var/www/mautic), and run:
cd /var/www/mautic
sudo -u www-data composer require symfony/sendgrid-mailer:*
This ensures all new packages are installed with the correct file ownership (www-data). You’ll now havesymfony/sendgrid-mailerin your Mautic project.
Step 2: Generate a SendGrid API Key
- Log into SendGrid at https://app.sendgrid.com/.
- Go to Settings → API Keys, then click Create API Key.
-
Name it something like Mautic and give it Full Access to Mail Send.
- Click Create & View to see the API Key. Copy and save it in a secure place.
Tip: You must set up domain authentication (SPF, DKIM and DMARC) in SendGrid’s “Sender Authentication” section.
Tip: Disable SendGrid's built in Click and Open tracking. It can break links generated by Mautic's click tracking.
These can be found in Settings > Tracking in your SendGrid dashboard.
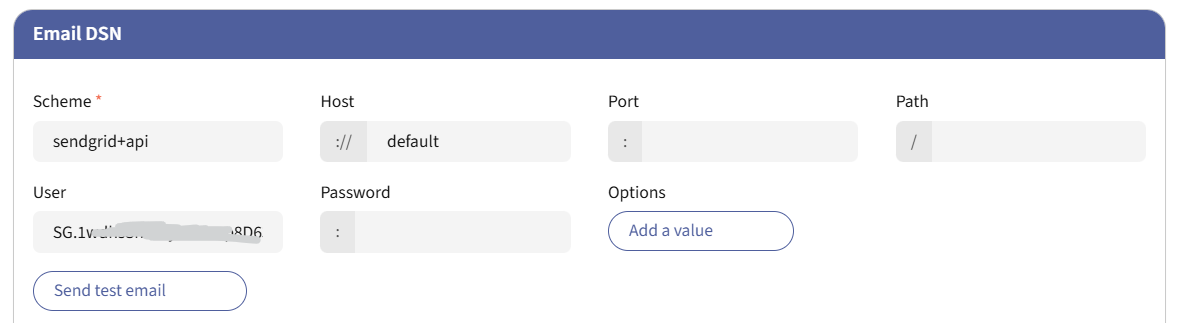
Step 3: Configure Mautic to Use sendgrid+api
In Configuration > Email Settings > Email DSN, set Scheme to “sendgrid+api”, Host to “default”, Port, Path and Password should be empty, and the User field should contain your API key set up in step 2.
Step 4: Test Your SendGrid Integration
- Clear your Mautic Cache: If you’ve edited config files manually, run:
php bin/console cache:clear
- Create a Test Email: In Mautic, go to Channels → Emails. Create a new email, fill in the details, and click Send Test Email to verify delivery.
- If it arrives in your inbox, your SendGrid configuration works!
This approach gives you maximum flexibility, leveraging Symfony Mailer’s sendgrid+api transport instead of traditional SMTP or Mautic’s built-in integration. Now, you can enjoy the reliability and analytics of SendGrid’s API alongside Mautic 5’s robust marketing automation platform.
Article Number: 231
Author: Apr 4, 2025
Last Updated: Apr 4, 2025
Author: GEM [[email protected]]
Online URL: https://kb.mautic.org/article/how-to-use-the-sendgrid-api-in-mautic-5-with-symfony-mailer.html